


Chapter 2: Setting up and connecting
25
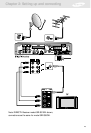
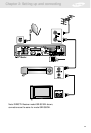
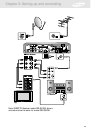
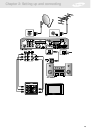
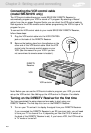
Connection option E:
DIRECTV Receiver to TV and A/V receiver
If connection option E best matches your needs,
follow these steps:
1 Make sure your TV, A/V receiver, and DIRECTV Receiver are turned off
and unplugged.
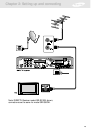
2 Connect the RG-6 coaxial cable running from your satellite dish to the
SATELLITE IN jack on the back of your DIRECTV Receiver.
3 Connect the coaxial cable running from your cable TV system or
off-air TV antenna to the IN FROM ANTENNA jack on the back of
the DIRECTV Receiver.
4 Connect the supplied phone cord to a telephone wall jack and to the
TEL LINE jack on the back of the DIRECTV Receiver.
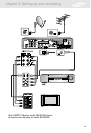
5 Matching like colors, connect the supplied A/V cable to the AUDIO OUT and
VIDEO OUT jacks on the back of the DIRECTV Receiver.
6 Connect the other ends of the A/V cables to appropriate audio and video input
jacks on your A/V receiver. Be sure to connect the outputs on the DIRECTV
Receiver to corresponding inputs on your A/V receiver (video out to video in,
left audio out to left audio in, right audio out to right audio in).
7 Connect another set of A/V cables (not included) to the second set of audio
and video output jacks on the the back of the DIRECTV Receiver.
8 Connect the other ends of these A/V cables to the appropriate audio and video
input jacks on your TV. Be sure to connect the outputs on the DIRECTV
Receiver to corresponding inputs on your TV.
9 (Optional) if your TV and A/V receiver both have S-Video jacks, you can also
make the S-Video connections shown in the illustration. This step is optional; it
provides improved picture quality.
10 Plug in the power cords for your TV, A/V receiver, and DIRECTV Receiver.
To watch DIRECTV
®
programming
Set your A/V receiver and TV to the appropriate input mode. See the manuals for
your A/V receiver and TV for instructions.)
Next Step
Now turn to page 29 to start using your DIRECTV Receiver.